Changing the HVAC Filter

Homeowner Maintenance: Changing the HVAC Filter

Part of responsible homeownership includes, of course, regular home maintenance.  And there are some tasks that, if deferred, can lead to a home system that’s inefficient and overworked, which can result in problems and expenses.  One such task is changing the filter of the home’s HVAC system.  It’s simple and inexpensive, and taking care of it at least every three months can mean the difference between optimum comfort and avoidable repairs.

What Can Go Wrong

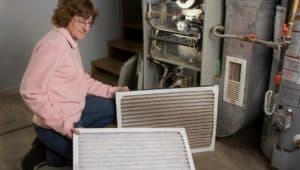
Furnace filter old and newMost homes have some sort of furnace or heat pump, and many of those homes (especially newer ones) have combined heating, ventilation, and air-conditioning or HVAC systems.  Each type uses some type of air filter or screen to prevent larger airborne particles (up to 40 microns) from entering the system and clogging sensitive machinery.  A system that has a dirty filter can suffer from pressure drops.  Pressure drops lead to reduced air flow, or “blow-out,” resulting in no air infiltration at all.  Any of these conditions can cause the system to work harder to keep the home warm or cool (depending on the season and the setting).  Any mechanical component that has to work harder to run efficiently puts undue stress on the whole system.  A stressed system leads to premature failure, resulting in repair or replacement.

In addition, a dirty filter that comes into contact with condensation absorbs moisture, which leads to mold growth that spreads throughout the home by the HVAC system.  Consequentially, this can lead to serious health consequences, not to mention a compromised unit that will likely require servicing and may require replacement, depending on the severity of the moisture problem.

Types of Filters

Furnace Filter ReplacementMost HVAC and furnace filters are disposable, made of biodegradable paper or similar media, and shaped in cells, screens, or fins designed to trap as much airborne debris as possible.  To save money, purchase filters in economical multi-packs.  There are many types that fit different models of furnace/HVAC units.  It’s important to use the appropriate filter for your unit.  Using the wrong size filter creates the same types of problems as having a dirty filter.  Your HVAC installer can show you where the filter goes and how to remove the old one and install a new one.  If it comes down to it, your unit may also have an affixed label with directions for easy filter replacement.

MERV?  Merv who?

If you’ve purchased filters, it’s likely you’ve run across the term MERV.  Who…er, what is MERV?  Minimum Efficiency Reporting Values.  In layman’s terms, it’s the filter’s ability to capture larger particles between 0.3 and 10 microns (µm).  Check out the EPA’s page for ratings and efficiencies.  Essentially, the higher the MERV rating the more particles it filters from the air.  Price is usually directly proportionate to the MERV rating.  (Higher MERV = higher price.) 

Which MERV is right for me?

There’s some debate as to which filter rating is the best.  The fact of the matter is, it’s very subjective.  Ask 10 different experts and you’ll get 10 different answers.  From my perspective, you should weigh the variables in your life.  How often do you run your system?  How particular are you about indoor air quality (IAQ)?  Do you have any pets?  How big are those pets?  Is your spouse disproportionality hairy?  Do you have allergies?  Are you allergic to your excessively hairy spouse?  Are you concerned with the cost?  Unless you have some underlying conditions or are just very particular about the IAQ in your home, stick with a filter that falls in the middle of the road.  When changing the HVAC filter in my house, MERV 8 is my filter of choice.  In my opinion, it offers the right balance of filtration and cost.

How Often?

Your HVAC or furnace technician should service your unit once a year.  Because a furnace/HVAC unit contains moving parts, it’s important that belts are not cracked and dry, and ventilation ductwork is not gapped, cracked, or rusted.  Components, such as coils and fans, should be clog-free and adequately lubricated for unimpeded operation.  This sort of evaluation is best left to the professional unless the homeowner has had the appropriate training.

The filter of the unit, especially if it’s an HVAC unit that gets nearly year-round use, should be changed by the homeowner at least every three months, but possibly more often.

Check your filter’s condition and change it once a month if:

  • dirty HVAC filter

    If your filter looks like this, change it.

    You run your unit six months a year to year-round.

  • You have pets.  Pet dander can become airborne and circulate through the home’s ventilation system just as typical household dust does.
  • You have a large family.  More activity means more household dust, dirt, and debris.
  • You smoke indoors.
  • You or someone in your household suffers from allergies or a respiratory condition.
  • You live in a particularly windy area or experience high winds for extended periods.  More so if there are no nearby shrubs or trees to provide a natural windbreak.
  • You live in an area prone to or having recently experienced any wildfires.  Airborne ash outdoors will eventually find its way indoors.
  • You have a fireplace that you occasionally use.
  • You live on a working farm or ranch.  Activity from field equipment and animals kicks up dust.  Dust and dirt then pull into the home’s ventilation system.
  • You have a large garden.  Depending on its size and how often you work it, gardening activity can contribute.  This includes tilling the soil, planting, pulling weeds, using herbicides and pesticides, and even watering.
  • There is construction taking place around or near the home.  You may be installing a new roof or a pool, or perhaps a neighbor is building a home or addition.  Even if the activity is only temporary, dust and debris from worksites adjacent to or near the house can be sucked into the home’s ventilation system, and this increased activity can tax your HVAC system.

Change the filter immediately if:

  • The filter appears damaged.  Regardless of how the damage occurs, a damaged filter that has bent fins, collapsed cells or holes will not work as well as an undamaged filter, especially if it allows system air to bypass the filter at any point.
  • The filter is damp.  A filter affected by moisture intrusion, system condensation, or even high indoor humidity can quickly become moldy and spread airborne mold spores throughout the home via the ventilation system.
  • There is evidence of microbial growth or mold on the filter.  Mold spores already infiltrating the home via the HVAC system are not only bad for the unit itself, but they can pose a health hazard for the family, ranging from an irritated respiratory system to a serious allergic reaction.  The musty smell produced by a moldy HVAC filter is also unpleasant and may take a while to completely eradicate from inside the home.  If you discover that you have a moldy air filter, it’s important to have the cause investigated further.  An InterNACHI inspector or HVAC technician can help determine the problem so that it doesn’t recur.

Tips on Changing the HVAC Filter

  • Turn off the unit before replacing the filter.
  • Use the right filter for your unit
  • Follow the directions for your unit to make sure you’re installing the filter properly.  For example, many filters use different colors for the front and back (or upstream and downstream flow).  This prevents improper installation.
  • Make sure there aren’t any gaps around the filter frame.  If this is the case, you may have the wrong size filter, or the filter itself may be defective or damaged.
  • Use a rag to clean up any residual dust before and after you replace the filter.
  • Securely replace any levers, gaskets, and/or seals.
  • Turn the unit on and observe it while it’s operating to make sure the filter stays in place.
  • Note the date of filter replacement in a convenient location for the next time you inspect it.  A filter that becomes dirty enough to change within a short period of time may indicate a problem with the unit or ventilation system, so monitoring how often the filter requires changing is important information for your technician to have.

Call a technician for servicing if:

  • Your unit fails to turn back on.
  • The fan slows or makes excessive noise, or the fins appear bent.
  • The coils are excessively dusty or clogged.
  • You notice moisture intrusion from an unknown source anywhere in the system.
Furnace Filter ChangeHomeowners who take care of the easy task of changing the HVAC filter can help prevent system downtime and avoidable expenses.  Don’t forget the added benefit of keeping your family living and breathing comfortably.  Your InterNACHI inspector can provide more useful tips and reminders during your annual home maintenance inspection.  For other useful homeowner’s maintenance tips, check out our other blogs here.

Winterizing your home

Get your home ready for winter

Realm Inspections Winterization Checklist Fuquay Varina

Winterization is the process of preparing a home for the harsh conditions of winter. Here in the south, it’s less of a concern than up north, but that doesn’t make it any less important.  Winterization is usually performed in the fall before excessive cold temperatures arrive. Winterization protects against damage from burst water pipes and heat loss from poor insulation and openings in the building’s thermal envelope. Realm Inspections understands how winterization works and gladly passes this information on to you.  Check out the thumbnail for a quick list of things to do to get ready for winter.


Plumbing System

Water damage caused by bursting pipes during cold weather can be devastating. A ruptured pipe will release water and not stop until someone shuts off the water. If no one is home to do this, an enormous quantity of water can flood a house and cause thousands of dollars worth of damage. Even during very small ruptures or ruptures that are stopped quickly, water leakage can result in mold and property damage. Broken water pipes can be costly to repair, therefore winterization of the plumbing system becomes critical.

  • All exposed water pipes in cold areas, such as attics, garages, and crawlspaces, should be insulated. Foam or fiberglass insulation can be purchased at most hardware stores.  Insulation should cover the entirety of a pipe.
  • Plastic is more tolerant of cold expansion than copper or steel. Houses in colder climates might benefit from the exclusive use of approved plastic plumbing.
  • The water supply for exterior pipes should be shut off from inside the house and then drained.
  • Sprinkler systems are particularly vulnerable to cracking due to cold-weather expansion. In addition to turning them, it helps to purge the system of any remaining water with compressed air.
  • Homeowners should be aware that much of the plumbing system travels through areas that are significantly colder than the rest of the house. Because it is impossible to monitor the temperature of every portion of the plumbing system, indoor air temperature should be kept high enough throughout the winter to keep pipes in any unheated places from freezing.

Leaks in the Building Envelope

Leaky window frames, door frames, and electrical outlets can allow warm air to escape into the outdoors.
  • Windows that leak will allow cold air into the home. Feeling for drafts with a hand or watching for horizontal smoke from an incense stick are a few easy ways to inspect for leaks. They can be repaired with tape or caulk.
  • On a breezy day, a homeowner can walk through the house and find far more leaks than they knew existed. Leaks are most likely in areas where a seam exists between two or more building materials.

Insulation

  • Because hot air rises into the attic, a disproportionately larger amount of heat is lost there than in other parts of the house. Like a winter hat that keeps a head warm, adequate attic insulation will prevent warm indoor air from escaping. Attic insulation should be 12 inches thick in cold climates.
  • Storm doors and windows should be installed to insulate the house and protect against bad weather.

Winterization and Heating Systems

Realm Inspections Fall House Fuquay VarinaThe heating system is used most during the winter so it’s a good idea to make sure that it works before it’s desperately needed. The following inspection and maintenance tips can be of some help to homeowners:
  • Test the furnace by raising the temperature on the thermostat. If it does not respond to the adjustment quickly it might be broken.
  • Replace the air filter if it’s dirty.
  • If the furnace is equipped with an oil or propane tank, the tank should be full.

Cooling Systems

  • Use a hose to remove leaves and other debris from the outdoor condensing unit, if the home is equipped with one. Protect the unit with a breathable waterproof cover to prevent rusting and freezing of its components.
  • Remove and store window air conditioners when they are no longer needed. Cold air can damage their components and enter the house through openings between the air conditioner and the windowpane.
  • Ceiling fans can be reversed in order to warm air trapped beneath the ceiling to recirculate. A fan has been reversed if it spins clockwise.

Chimneys and Fireplaces

  • The chimney should be inspected for nesting animals trying to escape the cold. Squirrels and raccoons have been known to enter chimneys for this reason.
  • The damper should open and close with ease. Smoke should rise up the chimney when the damper is open. If it doesn’t, this means that there is an obstruction in the chimney that must be cleared before the fireplace can be used.
  • A chimney-cleaning service professional should clean the chimney if it has not been cleaned for several years.
  • The damper should be closed when the fireplace is not in use. An open damper might not be as obvious to the homeowner as an open window, but it can allow a significant amount of warm air to escape.
  • Glass doors can be installed in fireplaces and wood stoves to provide an extra layer of insulation.

Winterization and your Roof

  • If debris is left in gutters, it can get wet and freeze, permitting the formation of ice dams that prevent water from draining. This added weight has the potential to cause damage to gutters. Also, trapped water in the gutter can enter the house and lead to the growth of mold. For these reasons, leaves, pine needles, and all other debris must be cleared from gutters. This can be done by hand or with a hose.
  • Missing shingles should be replaced.

Landscape

  • Patio furniture should be covered.
  • If there is a deck, it might need an extra coat of sealer.
Adequate winterization is especially crucial for homes that are left unoccupied during the winter. This sometimes happens when homeowners who own multiple properties leave one home vacant for months at a time while they occupy their summer homes. Foreclosed homes are sometimes left unoccupied, as well. The heat may be shut off in vacant homes in order to save money. Such homes must be winterized in order to prevent catastrophic building damage.
In addition to the information above, InterNACHI advises the following measures to prepare an unoccupied home for the winter:
  • Winterize toilets by emptying them completely. Antifreeze can be poured into toilets and other plumbing fixtures.
  • Winterize faucets by opening them and leaving them open.
  • Water tanks and pumps need to be drained completely.
  • Drain all water from indoor and outdoor plumbing.
  • Unplug all non-essential electrical appliances, especially the refrigerator. If no electrical appliances are needed, electricity can be shut off at the main breaker.

Have your home assessed for winter

In summary, home winterization is a collection of preventative measures designed to protect homes against damage caused by cold temperatures. These measures should be performed in the fall before it gets cold enough for damage to occur.  Have Realm Inspections come out and assess your home for you.  We offer abbreviated inspections at a reduced rate for this service.  Contact us today to get in front of the winter chill, schedule your Winterization Assessment here.

Aging in Place

“Aging in place” is the phenomenon describing senior citizens’ ability to live independently in their homes for as long as possible. Those who age in place will not have to move from their present residence in order to secure necessary support services in response to their changing needs.

The Baby Boomers

As the baby boomers age, the 60+ population will spike from roughly 45 million in recent years to more than 70 million by 2020. Research shows that baby boomers’ expectations of how they will receive care differ from that of their parent’s generation.  Overwhelmingly, they will seek care in their own homes and will be less likely to move into congregate living settings.

Why do many senior citizens prefer aging in place? 

Nursing homes, too many, represent a loss of freedom and reduced quality of life. Here are a few good reasons why these fears are justified:

  • In 2007, inspectors received 37,150 complaints about conditions in nursing homes. Roughly one-fifth of the complaints verified by federal and state authorities involved the abuse or neglect of patients. Specific problems included infected bedsores, medication mix-ups, poor nutrition, and other forms of neglect.
  • The proportion of nursing homes cited for deficiencies ranged from 76% in Rhode Island to as high as 100% in Alaska, Idaho, Wyoming, and Washington, D.C.
  • Many cases have been exposed in which nursing homes billed Medicare and Medicaid for services that were not provided.
  • A significant percentage of nursing homes had deficiencies that caused immediate jeopardy or harm to patients.

Aging-in-Place Inspections  InterNACHI certified Aging-in-Place Professional badge

Inspectors may recommend corrections and adaptations to the home to improve maneuverability, accessibility, and safety for elderly occupants. Some such alterations and recommendations for a home are as follows:

  • Appliances:
    • microwave oven in the wall or on the counter;
    • refrigerator and freezer side by side;
    • side-swing or wall oven;
    • controls that  are easy to read;
    • raised washing machine and dryer;
    • front-loading washing machines;
    • raised dishwasher with push-button controls;
    • stoves having electric cooktops with level burners for safely transferring between the burners; front controls and downdraft feature to pull heat away from user; light to indicate when surface is hot; and
    • replace old stoves with induction cooktops to help prevent burns.
  • Bathroom:
    • fold-down seat installed in the shower;
    • adjustable showerheads with 6-foot hose;
    • light in shower stall;
    • wall support, and provision for adjustable and varied-height counters and removable base cabinets;
    • contrasting color edge border at countertops;
    • at least one wheelchair-maneuverable bath on the main level;
    • bracing in walls around the tub, shower, shower seat, and toilet for installation of grab bars;
    • if the stand-up shower is used in the main bath, it is curbless and wide;
    • low bathtub;
    • toilet higher than a standard toilet, or height-adjustable;
    • design of the toilet paper holder allows rolls to be changed with one hand;
    • wall-hung sink with knee space and panel to protect the user from pipes; and
    • slip-resistant flooring in the bathroom and shower.
  • Counters:
    • base cabinet with roll-out trays;
    • pull-down shelving;
    • wall support, and provision for adjustable and varied-height counters and removable base cabinets;
    • upper wall cabinetry lower than conventional height;
    • accented stripes on edge of countertops to provide visual orientation to the workspace;
    • counter space for dish landing adjacent to or opposite all appliances;
    • glass-front cabinet doors; and
    • open shelving for easy access to frequently used items.
  • Exterior:
    • low-maintenance exterior (vinyl, brick, etc); and
    • low-maintenance shrubs and plants.
  • Entry:
    • sensor light at exterior no-step entry focusing on the front-door lock;
    • non-slip flooring in the foyer;
    • accessible path of travel to the home;
    • at least one no-step entry with a cover;
    • entry door sidelight or high/low peep hole viewer; sidelight should provide both privacy and safety;
    • doorbell in an accessible location; and
    • a surface on which to place packages while opening the door.
  • Electrical, Lighting, Safety, and Security:
    • install new smoke and CO detectors;
    • install automated lighting, an emergency alert system, or a video-monitoring system;
    • easy-to-see and read thermostats;
    • light switches by each entrance to halls and rooms;
    • light receptacles with at least two bulbs in vital places (exits, bathroom);
    • light switches, thermostats, and other environmental controls placed in accessible locations no higher than 48 inches from the floor;
    • move electrical cords out of the flow of traffic;
    • replace standard light switches with a rocker or touch-light switches; and
    • pre-programmed thermostats.
  • Faucets:
    • thermostatic or anti-scald controls;
    • lever handles or pedal-controlled; and
    • pressure-balanced faucets.
  • Flooring:
    • if carpeted, use low-density with a firm pad;
    • smooth, non-glare, slip-resistant surfaces, interior and exterior; and
    • color and texture contrast to indicate changes in surface levels.
  • Hallways:
    • wide;
    • well-lit; and
    • fasten down rugs and floor runners, and remove any that are not necessary.
  • Heating, Ventilation, and Air Conditioning:
    • install energy-efficient units;
    • HVAC should be designed so filters are easily accessible; and
    • windows that can be opened for cross-ventilation and fresh air.
  • Miscellaneous:
    • 30-inch by 48-inch clear space at appliances, or 60-inch diameter clear space for turns;
    • multi-level work areas to accommodate cooks of different heights;
    • loop handles for easy grip and pull;
    • pull-out spray faucet;
    • levered handles;
    • in multi-story homes, laundry chute or laundry facilities in master bedroom;
    • open under-counter seated work areas; and
    • placement of task lighting in appropriate work areas.
  • Overall Floor Plan:
    • main living on a single story, including a full bath
    • 5-foot by 5-foot clear turn space in the living area, kitchen, bedroom, and bathroom, and
    • no steps between rooms on a single level.
  • Reduced Maintenance and Convenience Features:
    • easy-to-clean surfaces;
    • built-in recycling system;
    • video phones;
    • central vacuum;
    • built-in pet feeding system; and
    • intercom system.
  • Stairways, Lifts, and Elevators:
    • adequate hand rails on both sides of the stairway
    • residential elevator or lift, and
    • increased visibility of stairs through contrast strip on top and bottom stairs, and color contrast between treads and risers on stairs with the use of lighting.
  • Storage:
    • lighting in closets;
    • adjustable closet rods and shelves; and
    • easy-open doors that do not obstruct access.
  • Windows:
    • plenty of windows for natural light;
    • low-maintenance exterior and interior finishes;
    • lowered windows, or taller windows with lower sill height; and
    • easy-to-operate hardware.

Advice for those who wish to age in place:

  • Talk with your family about aging-in-place
    • Do you want to downsize to a smaller single-family home, or do you plan to stay put in your traditional family home?
  • Take a look at your finances and retirement funds.
    • With your current savings and assets, will you be able to pay for home maintenance? Consider starting a separate retirement savings account strictly for home maintenance.
  • Remodel your home before your mobility becomes limited.
    • As you age, changes in mobility, hearing, vision, and overall health and flexibility will affect how easily you function in your home. Consider making your home “age-friendly” as a phased-in and budgeted home improvement, rather than waiting until you need many modifications at a time due to a health crisis.
    • If you decide before you retire that you want to live in your current home through the remainder of your life, consider paying for “big ticket – long life” home projects while you still have a healthy income. Such items may include having the roof assessed or replaced, replacing and upgrading the water heater or cooling unit, completing termite inspections and treatment, having a septic tank inspection and replacement, as needed, and purchasing a riding lawn mower.

In summary

Aging in place is a way by which senior citizens can avoid being dependent on others due to declining health and mobility.  InterNACHI advocates healthy living, as it plays a vital role in your ability to age in place. Most seniors leave their homes due to functional and mobility limitations that result from medical crises, and an inability to pay for support to stay with them in their homes. Effectively managing health risks and maintaining a healthy lifestyle can help you stay strong, age well, and live long at your own home.

Aging-in-Place Home Inspections
Do you or a loved one wish to live out their days in the comfort of their own home?  We’ll be glad to inspect the home to make sure they are set up for success.  Schedule an aging-in-place inspection with Realm Inspections today!
For additional information, check out InterNACHI’s Aging-in-Place flyer.
Article by Nick Gromicko, CMI® and Kate Tarasenko 

Smoke Detector Types, Which One to Use?

Smoke detector located on the ceiling If you didn’t already know, the two most commonly recognized smoke detector types are ionization smoke detection and photoelectric smoke detectionOh, and just an FYI, do not confuse “photoelectric” with “photochemical” as I did.  They are not the same.  The latter is the technology used in Carbon Monoxide (CO) detectors… which I’ll save for another post.

So, Ionization vs Photoelectric, which smoke detector types are right for me?  Is there really a difference?

To answer the first question, it depends.  To answer the second question, yes there really is.  Here’s the truth, you can ask 10 different people and get 10 different opinions.  From my seat, I think response time is the ultimate qualifier.  While both respond to fire in relatively short order, it’s the smoldering fire (no flame) that is the deciding factor for me.  Most people know that the #1 killer of fires is smoke inhalation, not the flames.  So wouldn’t we err on the side of caution and go with the technology that detects smoke the fastest?  The simple answer, yes, of course, we would.  And for that reason, photoelectric should be the clear winner.  However, it is important to acknowledge that not all fires are smoldering fires.  So, with that consideration, a device comprising both technologies would be the absolute winner.

Now, just like everything else that is good for us, there is a cost associated with the different technologies.  Photoelectric is more expensive than ionization, and combination units are more expensive than all others.  Ultimately, cost should be the least of your concerns when outfitting your home with smoke detection devices.  For me and my loved ones, combination units are the ones going in my home.

Hate reading? Check out this 5-minute video demonstrating the different smoke detector types.  It may just save your life!

Check out this video demonstrating the difference between the two technologies


Let’s take a deeper dive into the different smoke detector types.

• Ionization smoke alarms

Smoke filled room typical of house fires

The most common smoke detector types (usually due to cost) are Ionization smoke alarms.  These are generally more responsive to fires with visible flames or environments heavily saturated with smoke.
How they work: Ionization-type smoke alarms have a small amount of radioactive material between two electrically charged plates.  These plates ionize the air and cause current to flow between the plates. When smoke enters the chamber, it disrupts the flow of ions, thus reducing the flow of current and activating the alarm. Download this chart on ionization smoke alarms.

• Photoelectric smoke alarms

Smoldering couch fire from lit cigarette

Photoelectric smoke alarms are generally more responsive to fires that begin with a long period of smoldering (called “smoldering fires”).  Think of a cigarette that may not have been fully extinguished and dumped in the trash.  Another example is that of an overheating appliance that doesn’t actually burn but smokes before a flame is present.

How they work: Photoelectric-type alarms aim a light source into a sensing chamber at an angle away from the sensor. Smoke enters the chamber, reflects the light onto the sensor, thus triggering the alarm. Download this chart on photoelectric smoke alarms.

The U.S. Fire Administration (USFA) is aware that there is a controversy about smoke detector types and which is most appropriate to protect people in their homes. 

The body of scientific knowledge about fire, smoke, and smoke detection has developed over many years and is quite extensive. The USFA has either fully or partially funded a number of research efforts.  These include a recent study by the National Institute of Standards and Technology’s (NIST) Center for Fire Research. Other contributors to this data include the Consumer Product Safety Commission (CPSC), the National Fire Protection Association, Underwriters Laboratories, the Home Fire Safety Council, the Residential Fire Safety Institute, the Home Fire Sprinkler Coalition, and distinguished academics with expertise in smoke alarm and sensor technology.

The body of research reflects the following:

  • There are two types of smoke alarms in general use for home smoke alarms, Photoelectric and Ionization. These smoke alarms sense the presePost fire house image missing roof and most of the second floornce of smoke differently.
  • The type of smoke produced by fire depends on the type of fire. Flaming fires produce a different type of smoke than smoldering fires.
  • Both smoke alarms will detect the smoke from either a smoldering fire or a flaming fire. It has been established and well known for many years that:
    • Ionization smoke alarms tend to respond faster to the smoke produced by flaming fires than photoelectric smoke alarms.
    • Photoelectric smoke alarms tend to respond faster to the smoke produced by smoldering fires than ionization smoke alarms.
  • In some full-scale fire tests, the difference in the time to alarm between ionization and photoelectric smoke alarms was found to be trivial. In other full-scale fire tests, the difference in response time was considerable.

Based on this information, the USFA provides guidance to the public and to state and local legislative bodies.  Either body may be grappling with the issue of determining which smoke detector types to select for residential use.  Their guidance includes:

  • We cannot state that one type of alarm is better than another because every fire is different.
  • Because both ionization and photoelectric smoke alarms are better at detecting distinctly different yet potentially fatal fires, and because no one can predict what type of fire might start in a home, the USFA recommends that every home and place where people sleep be equipped with either
    • both ionization and photoelectric smoke alarms, or
    • dual sensor smoke alarms (which contain both ionization and photoelectric smoke sensors).
  • The location of a smoke alarm within a home may be more important than the type of smoke alarm present, depending on the location of a fire. The USFA recommends that users follow the manufacturer’s guidance along with current standards on the recommended location of smoke alarms in a home.

To wrap this up

For each of the smoke detector types, the advantage they provide may be critical to life safety in some fire situations.  Fatal home fires, day or night, include a large number of smoldering fires and a large number of flaming fires. You cannot predict the type of fire you may have in your home or when it will occur. Any smoke alarm technology, to be acceptable, must perform for both types of fires in order to provide sufficient warning. Regardless of the type of fire, for all times of the day or night, and whether you are asleep or awake.
For the best protection, use both types of smoke alarm technologies.

Choosing the Right Home Inspector

Buying a home? It’s probably the most expensive purchase you’ll ever make. This is no time to shop for a cheap inspection. The cost of a home inspection is very small relative to the value of the home being inspected. The additional cost of hiring an InterNACHI-Certified Professional Inspector® is almost insignificant.
You have recently been crunching the numbers, negotiating offers, adding up closing costs, shopping for mortgages, and trying to get the best deals. Don’t stop now. Don’t let your real estate agent or anyone else talk you into skimping here.  InterNACHI-certified inspectors perform the best inspections by far.
InterNACHI-certified inspectors earn their fees many times over. They do more, they deserve more, and — yes — they generally charge a little more. Do yourself a favor… and pay a little more for the quality inspection you deserve.

The licensing of home inspectors only sets a minimum standard. Even though required in the state of North Carolina, being licensed is really only akin to the price of admission.  Much like being up to code, any less would be illegal.  Imaginary people, children, psychics (who claim to “sense” if a house is OK), and even pets can theoretically be home inspectors.  InterNACHI, the International Association of Certified Home Inspectors, front-ends its membership requirements.

InterNACHI inspectors must:

  • Pass InterNACHI’s Online Inspector Examination, and re-take and pass it every three years
  • Complete InterNACHI’s online Code of Ethics Course
  • Take InterNACHI’s online Standards of Practice Course
  • Submit a signed Membership Affidavit
  • Carry E&O Insurance (also required by NC Home Inspector Licensing Board);
  • Adhere to InterNACHI’s Standards of Practice
  • Abide by InterNACHI’s Code of Ethics
  • Submit four mock inspection reports to InterNACHI’s Report Review Committee before performing their first paid home inspection for a client if the candidate has never performed a fee-paid home inspection previously
  • Within the first year of membership, Inspectors must successfully pass the following accredited courses and exams provided through InterNACHI:
    • “Safe Practices for the Home Inspector”
    • “25 Standards Every Inspector Should Know”
    • “Residential Plumbing Overview for Inspectors”
    • “How to Perform Residential Electrical Inspections”
    • “How to Perform Roof Inspections”
    • “How to Inspect HVAC Systems”
    • “Structural Issues for Home Inspectors”
    • “How to Perform Exterior Inspections”
    • “How to Inspect the Attic, Insulation, Ventilation, and Interior”
    • “How to Perform Deck Inspections”
    • “How to Inspect for Moisture Intrusion”
    • “How to Inspect Fireplaces, Stoves, and Chimneys”
  • Pursue inspection-related training by taking 24 hours of additional accredited Continuing Education each year
  • Maintain Online Continuing Education Log, per InterNACHI’s rigorous Continuing Education policy

All InterNACHI Certified Inspectors have access to:

  • Global Message Board for exchanging information and tips with colleagues and experts
  • “What’s New” section so that they can keep up with the latest news and events in the inspection industry
  • Time-tested Inspection Agreement, which keeps them (and you) away from lawsuits
  • Report Review/Mentoring Services
  • Real estate agent Hold-Harmless Clause
  • Many other benefits, training, marketing tools, and information to help themselves, as well as consumers and real estate professionals.
So, the next time you need a home inspector (or need to refer your clients to one), make sure the Inspector is a member of InterNACHI.

10 Easy Ways to Save Money & Energy in Your Home

Original article was written by Nick Gromicko, CMI®, Ben Gromicko, and Kenton Shepard.  Updated and revised by Joe Boos, CPI

Most people don’t know how easy it is to make their homes run on less energy, and here at InterNACHI, we want to change that. 

Homeowners can make drastic reductions in heating, cooling, and electricity costs through very simple changes, most of which they can do themselves. Of course, for homeowners who want to take advantage of the most up-to-date knowledge and systems in home energy efficiency, InterNACHI energy auditors can perform in-depth testing to find the best energy solutions for your particular home. 

Why make your home more energy efficient? Here are a few good reasons:

  • Federal, state, utility, and local jurisdictions’ financial incentives, such as tax breaks, are very advantageous for homeowners in most parts of the U.S.
  • It saves money. It costs less to power a home that has been converted to be more energy-efficient.
  • It increases the comfort level indoors.
  • It reduces our impact on climate change. Many scientists now believe that excessive energy consumption contributes significantly to global warming.
  • It reduces pollution. Conventional power production introduces pollutants that find their way into the air, soil, and water supplies.

1. Find better ways to heat and cool your house. 

As much as half of the energy used in homes goes toward heating and cooling. The following are a few ways homeowners can reduce energy bills through adjustments to the heating and cooling systems:

  • Install a ceiling fan. Ceiling fans require much less energy than air conditioning units. The moving air across and around our bodies reduces the perceived temperature by almost 10°. Similar to wind-chill factor.
  • Periodically replace air filters in air conditioners and heaters. Replace them every quarter or monthly if you have pets.
  • Set your thermostats to an appropriate temperature. Specifically, they should be turned down at night and when no one is home. About 2% of the heating bill will be saved in most homes for each degree that the thermostat is lowered for at least eight hours each day. Turning down the thermostat from 75° F to 70° F, for example, saves about 10% on heating costs.
  • Install a programmable thermostat. A programmable thermostat saves money by allowing heating and cooling appliances to be automatically turned down when no one is home and at night. Programmable thermostats contain no mercury and, in some climate zones, can save up to $150 per year in energy costs.  
  • Better yet, install a smart thermostat. You can fully customize your system to maintain the temperature in your home. Set up geofencing so the thermostat knows when people are home and can adjust the temperature without any input. You can also control the thermostat remotely or set up vacation schedules. The system can modify the temperature during vacation mode outside normal comfort ranges allowing you to save even more money if you intend to be away for an extended amount of time.
  • Install a wood stove or a pellet stove. These are more efficient sources of heat than furnaces.
  • At night, curtains drawn over windows will better insulate the room.

2. Install a tankless water heater.

Demand-type water heaters (tankless or instantaneous) provide hot water only as it is needed. They don’t produce the standby energy losses associated with traditional storage water heaters, saving energy costs. Tankless water heaters heat water directly without the use of a storage tank. When a hot water tap is turned on, cold water travels through a pipe into the unit. A gas burner or an electric element heats the water. As a result, demand water heaters deliver a constant supply of hot water. You don’t need to wait for a storage tank to fill up with enough hot water. One caveat to a tankless system is to make sure it is appropriately sized for the demand of multiple simultaneous users.

3. Replace incandescent lights.

The average household dedicates 11% of its energy budget to lighting. Traditional incandescent lights convert approximately only 10% of the energy they consume into light, while the rest becomes heat. The use of new lighting technologies, such as light-emitting diodes (LEDs) and compact fluorescent lamps (CFLs), can reduce the energy use required by lighting by 50% to 75%. Advances in lighting controls offer further energy savings by reducing the amount of time that lights are on but not being used. Here are some facts about CFLs and LEDs:

  • CFLs use 75% less energy and last about 10 times longer than traditional incandescent bulbs.
  • LEDs last even longer than CFLs and consume less energy.
  • LEDs have no moving parts and, unlike CFLs, they contain no mercury.

Better yet, swap out some of the most commonly used bulbs for smart bulbs. Like the smart thermostat, smart bulbs give you complete control over the lighting. The backend systems allow you to deploy scenes based on time of day and occupancy.

4. Seal and insulate your home.

Sealing and insulating your home is one of the most cost-effective ways to make a home more comfortable and energy-efficient, and you can do it yourself. A tightly sealed home can improve comfort and indoor air quality while reducing utility bills. An InterNACHI energy auditor can assess leakage in the building envelope and recommend fixes to increase comfort and energy savings dramatically.

The following are some common places where leakage may occur:

  • electrical receptacles/outlets
  • mail slots
  • around pipes and wires
  • wall- or window-mounted air conditioners
  • attic hatches
  • fireplace dampers
  • inadequate weather-stripping around doors
  • baseboards
  • window frames
  • switch plates

Because hot air rises, air leaks are most likely to occur in the attic. Homeowners can perform a variety of repairs and maintenance to their attics that save them money on cooling and heating, such as: 

  • Plug the large holes. Locations in the attic where the leakage is most likely to be the greatest are where walls meet the attic floor, behind and under attic knee walls, and in dropped-ceiling areas.
  • Seal the small holes. You can easily do this by looking for areas where the insulation is darkened—darkened insulation results from dusty interior air being filtered by insulation before leaking through small holes in the building envelope. In cold weather, you may see frosty areas in the insulation caused by warm, moist air condensing and freezing as it hits the cold attic air. In warmer weather, you’ll find water staining in these same areas. Use expanding foam or caulk to seal the openings around plumbing vent pipes and electrical wires. Cover the areas with insulation after the caulk is dry.
  • Seal up the attic access panel with weather-stripping. You can cut a piece of fiberglass or rigid foamboard insulation in the same size as the attic hatch and glue it to the back of the attic access panel. If you have pull-down attic stairs or an attic door, these should be sealed similarly.

5. Install efficient showerheads and toilets.

Homeowners can install the following to conserve water usage in homes:

  • Low-flow showerheads. They are available in different flow rates, and some have a pause button that shuts off the water while the bather lathers up;
  • Low-flow toilets. Toilets consume 30% to 40% of the total water used in homes, making them the most significant water users. Replacing an older 3.5-gallon toilet with a modern, low-flow 1.6-gallon toilet can reduce usage by an average of 2 gallons per flush (GPF), saving 12,000 gallons of water per year. Low-flow toilets usually have “1.6 GPF” marked on the bowl behind the seat or inside the tank;
  • Vacuum-assist toilets. This type of toilet has a vacuum chamber that uses a siphon action to suck air from the trap beneath the bowl, allowing it to fill with water to clear waste quickly. Vacuum-assist toilets are relatively quiet; and
  • Dual-flush toilets. Dual-flush toilets have been used in Europe and Australia for years and are now gaining in popularity in the U.S. Dual-flush toilets let you choose between a 1-gallon (or less) flush for liquid waste and a 1.6-gallon flush for solid waste. Dual-flush 1.6-GPF toilets reduce water consumption by an additional 30%.

6. Use appliances and electronics responsibly.

Appliances and electronics account for about 20% of household energy bills in a typical U.S. home. The following are tips that will reduce the required energy of electronics and appliances:

  • Refrigerators and freezers should not be located near the stove, dishwasher, or heat vents or exposed to direct sunlight. Exposure to warm areas will force them to use more energy to remain cool. 
  • Computers should be shut off when not in use. If unattended computers must be left on, their monitors should be shut off. According to some studies, computers account for approximately 3% of all energy consumption in the United States.
  • Use efficient ENERGY STAR-rated appliances and electronics. These devices, approved by the U.S. Department of Energy and the Environmental Protection Agency’s ENERGY STAR Program, include TVs, home theater systems, DVD players, CD players, receivers, speakers, and more. According to the EPA, if just 10% of homes used energy-efficient appliances, it would reduce carbon emissions by the equivalent of 1.7 million acres of trees.
  • Chargers, such as those used for laptops and cell phones consume energy when they are plugged in. When they are not connected to electronics, chargers should be unplugged.
  • Laptop computers consume considerably less electricity than desktop computers.

7. Install daylighting as an alternative to electrical lighting.

Daylighting is the practice of using natural light to illuminate the home’s interior. It can be achieved using the following approaches:

  • Skylights. They must be double-pane, or they may not be cost-effective. Flashing skylights properly is key to avoiding leaks.
  • Light shelves. Light shelves are passive devices designed to bounce light deep into a building. They may be interior or exterior. Light shelves can introduce light into spaces up to 2½ times the distance from the floor to the top of the window, and advanced light shelves may introduce four times that amount;
  • Clerestory windows. Clerestory windows are short and wide, set high on the wall. Protected from the summer sun by the roof overhang, they allow winter sun to shine through for natural lighting and warmth; and 
  • Light tubes / Sun tubes. Light tubes use a unique lens designed to amplify low-level light and reduce light intensity from the midday sun. Sunlight is channeled through a tube coated with a highly reflective material and then enters the living space through a diffuser designed to distribute light evenly.

8. Insulate windows and doors.

About one-third of the home’s total heat loss usually occurs through windows and doors. The following are ways to reduce energy lost through windows and doors:

  • Seal all window edges and cracks with rope caulk, the cheapest and most straightforward option.
  • Windows can be weather-stripped with a special lining that is inserted between the window and the frame. For doors, apply weather-stripping around the whole perimeter to ensure a tight seal when they’re closed. Install quality door sweeps on the bottom of the doors if they aren’t already in place.
  • Install storm windows at windows with only single panes. A removable glass frame can be installed over an existing window.
  • If existing windows have rotted or damaged wood, cracked glass, missing putty, poorly fitting sashes, or locks that don’t work, they should be repaired or replaced.

9. Cook smart.

An enormous amount of energy is wasted while cooking. The following recommendations and statistics illustrate less wasteful ways of cooking:

  • Convection ovens are more efficient than conventional ovens. They use fans to force hot air to circulate more evenly, thereby allowing food to be cooked at a lower temperature. Convection ovens use approximately 20% less electricity than conventional ovens.
  • Microwave ovens consume approximately 80% less energy than conventional ovens.
  • Cook with pans that match the size of the heating element or flame. 
  • Using lids on pots and pans will heat food more quickly than cooking in uncovered pots and pans.
  • Pressure cookers reduce cooking time dramatically.
  • When using conventional ovens, place food on the top rack. The top rack is hotter and will cook food faster. 

10. Change the way you do laundry.

  • Do not use the medium setting on your washer. Wait until you have a whole load of clothes, as the medium setting saves less than half of the water and energy used for a full load.
  • Avoid using high-temperature settings when clothes are not very soiled. Water that is 140° F uses far more energy than 103° F for the warm-water setting, but 140° F isn’t that much more effective for getting clothes clean.
  • Clean the lint trap every time before you use the dryer. Not only is excess lint a fire hazard, but it will prolong the amount of time required for your clothes to dry.
  • If possible, air-dry your clothes on lines and racks.
  • Spin-dry or wring clothes out before putting them into a dryer. 

Homeowners who take the initiative to make these changes usually discover that the energy savings are more than worth the effort. InterNACHI home inspectors can make this process much easier because they can perform a more comprehensive assessment of energy savings potential than the average homeowner can.  

Taxes and Your Home Inspection

Buying a new home is a significant investment that comes with a good amount of tax breaks.

A common question often asked, “Can I Deduct a Home Inspection on My Taxes”?

The short answer is “no.”

While there are many tax benefits to owning a home, deducting the home inspection, unfortunately, is not one of them. However, if it’s an investment property, such as a rental, deduct away.  

Tip: If you are starting the process and have a moderate amount of flexibility, consider purchasing a multiplex. You can live in one of the units and rent out the others. In that instance, you can deduct your inspection cost since it is now considered a business expense. 

I digress…

When you purchase a home, you may hear that closing costs are deductible. Closing costs or settlement costs (they’re the same thing), often get split between the buyer and the seller. Your escrow closing statement will have an itemized list of the costs paid at closing. The mortgage interest and the property tax paid is deductible. Borrowers pay points when closing the loan to reduce the interest rate; these are usually deductible.

Non-Deductible Expenses

  • General home inspection
  • Specialized contractor inspections (e.g., plumbing, HVAC, etc.)
  • Recording fees
  • Title insurance
  • Appraisals

While these items are not deductible, they get added to the basis of your home. This means that when you sell your home, the costs are added to the original purchase price to determine capital gains. For example, if you bought a house for $850,000 and paid $1,200 in non-deductible fees, your new cost basis is $851,200.

Investment Property Expenses

It is considered an investment property when you are not using the single-family property as your residence or personal vacation home. The IRS allows rental property owners to deduct many more expenses because it is now considered a business. I suggest you contact your Accountant or Tax Attorney for specifics. 

Copyright © 2020-, Realm Inspections, All rights reserved. Website by Spectora Hosting